Cladding Walls with Large-Format Tile: Creating Flawless Interiors
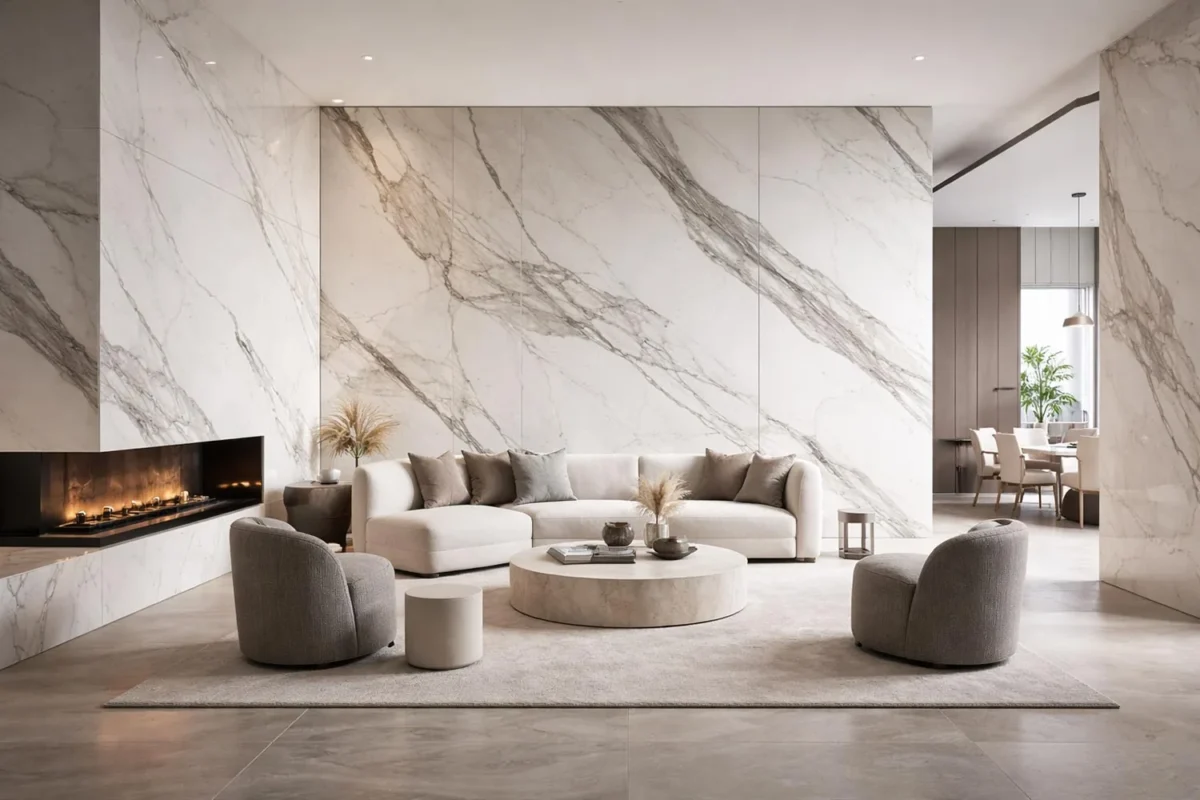
Large-format tile walls are a new level of design
Cladding walls with large-format tile is a revolutionary approach to interior finishing that radically changes how space is perceived. If large tile used to be applied mainly on floors, today it is confidently conquering vertical surfaces, creating an unrivalled effect of monolithic look and luxury.
M-STONE is a recognised leader in cladding walls with large-format tile, porcelain stoneware and natural stone in Kyiv and Ukraine. Our craftsmen master unique technologies for the vertical installation of large slabs, ensuring flawless quality and durability of the surface.
Advantages of large-format tile on walls
Visual effects
An illusion of space Large slabs without numerous joints visually widen a room. The wall looks like a single monolithic surface, which gives a feeling of more space even in small rooms.
A seamless effect A minimum number of joints (1.5-2 mm) with rectified tile makes them almost invisible. The result is a continuous surface imitating natural stone or concrete.
Realistic imitation Modern porcelain stoneware can reproduce the texture of marble, travertine, onyx, concrete and metal perfectly. A large format lets the pattern run without being interrupted by joints.
The book-match effect A special laying technique in which two neighbouring slabs create a mirror pattern, like an open book. It looks especially striking when imitating marble with expressive veining.
The vein-match effect The continuation of veins and patterns from one slab to another to create an uninterrupted picture. It needs careful selection of slabs and a high level of craftsmanship from the installers.
Practical advantages
Hygiene Fewer joints mean fewer places for dirt, bacteria and fungus to build up. This is critically important for bathrooms, kitchens and medical facilities.
Easy care The smooth surface of large slabs is easy to wash and needs no special care. There is no need to scrub numerous joints.
Moisture resistance Porcelain stoneware and natural stone with proper treatment are ideal for wet rooms: bathrooms, showers, swimming pools.
Durability Quality cladding lasts for decades without losing its appearance and performance properties.
Heat resistance The tile is not afraid of temperature changes, which matters for kitchens and rooms with fireplaces.
Chemical resistance Porcelain stoneware is resistant to most household chemicals, which makes care easier.
Types of large-format tile for walls
Thin porcelain stoneware (3-6 mm)
Characteristics
- Thickness: 3, 3.5, 5, 6 mm
- Sizes: up to 160×320 cm
- Weight: much less than standard tile
- Flexibility: it can follow slight bends in the surface
Advantages for walls
- Lightness: less load on the structure
- The possibility of installing over existing coverings
- Easier transport and handling
- Savings on adhesive
Application
- Wall cladding in residential rooms
- Furniture fronts
- Door leaves
- Light partitions
- Cladding columns
Popular brands
- Laminam (Italy)
- Neolith (Spain)
- Kerlite by Cotto d’Este (Italy)
- Fiandre (Italy)
Standard porcelain stoneware (8-10 mm)
Characteristics
- Thickness: 8, 9, 10 mm
- Sizes: up to 120×240 cm
- Versatility of use
Advantages
- An optimal combination of quality and practicality
- High strength
- A wide choice of designs
Application
- Walls in bathrooms
- Kitchen backsplashes
- Accent walls
- Commercial premises
Natural stone
Marble Thin marble slabs (15-20 mm) are ideal for wall cladding. Popular varieties for walls:
- Bianco Carrara: classic white
- Calacatta: premium with golden veining
- Statuario: the whitest with contrasting veining
- Nero Marquina: black for contrast
Travertine The warm shades of travertine create a cozy atmosphere:
- Classic: beige with characteristic pores
- Noce: a rich brown
- Silver: a cool grey
Onyx Translucent backlit onyx is an exclusive solution for walls:
- White onyx: maximum light transmission
- Honey onyx: warm golden tones
- Green onyx: exotic and luxurious
Where large-format tile is used on walls
Bathroom
The bathroom is the most popular place for large-format tile on walls.
Full cladding All walls from floor to ceiling are clad with large-format tile. It creates the effect of a monolithic space without transitions and junctions.
Advantages
- Maximum hygiene
- Ease of cleaning
- Visual enlargement of the space
- No joints where moisture can build up
Recommendations from M-STONE
- Imitation of Calacatta or Statuario marble: the classic of luxury
- Book-match laying to create a symmetrical pattern
- Backlit niches for an extra effect
- Combining light marble on the walls with a dark floor
The shower area Large-format tile is ideal for shower cubicles and walk-in showers:
- A minimum of joints means a minimum of places for mould
- Easy cleaning
- A luxurious look
The area behind the washbasin A single large slab can cover the whole wall behind the washbasin, creating the effect of a solid surface.
The bath panel Large-format tile on the bath panel looks much more striking than standard sizes.
The kitchen
The kitchen backsplash Large-format tile is an ideal solution for a kitchen backsplash:
- One or two slabs along the whole length of the work area
- A minimum of joints means easy removal of grease
- Resistance to temperatures and moisture
- A striking appearance
Popular designs for a backsplash
- Marble imitation: classic elegance
- Concrete: an industrial style
- Metal: hi-tech
- Monochrome: minimalism
The wall behind the dining table An accent wall of marble-look or concrete-look large-format tile becomes the central element of a kitchen-dining room.
The island Cladding a kitchen island with large-format tile creates the effect of a monolithic structure.
Living room
An accent wall A single wall of large-format tile radically changes the character of a room:
- The TV zone: marble-look tile as a backdrop for the TV
- The sofa zone: the wall behind the sofa as the main accent
- The fireplace zone: cladding the wall around the fireplace
Design solutions
- Book-match with a Calacatta imitation: luxury and elegance
- Backlit concrete: modern minimalism
- Travertine: warmth and coziness
- Onyx with LED backlighting: magic and exclusivity
Columns and niches Cladding columns and finishing niches with large-format tile adds architectural expressiveness.
Bedroom
The wall behind the headboard Large-format tile behind the bed creates a striking accent:
- Backlit onyx imitation: a romantic atmosphere
- A fabric texture: warmth and coziness
- Marble: classic elegance
The dressing-room area Cladding the walls of a dressing room with large-format tile is a practical and aesthetic solution.
Hallway and lobby
The first impression The hallway is the face of the home, and large-format tile on the walls creates the right impression:
- Stone imitation: solidity and reliability
- A mirror surface: visual widening
- Backlit panels: a WOW effect
Practicality Tile on hallway walls:
- Resistance to dirt
- Easy to clean
- Durability
Commercial premises
Hotels
- Lobby and reception
- Premium-class rooms
- Conference rooms
- Spa areas
Restaurants and cafés
- Bars and bar counters
- Guest halls
- VIP rooms
- Restrooms
Offices
- Reception
- Meeting rooms
- Executive offices
- Representative areas
Shops
- Fitting rooms
- Product presentation areas
- Shop windows
Technology of installing large-format tile on walls
Features of vertical installation
Laying large-format tile on walls is much harder than on floors:
Gravity The tile tends to slide down under its own weight until the adhesive sets. Special fixing techniques are needed.
Access Working at height requires scaffolding, platforms or special devices.
Precision Vertical surfaces do not forgive mistakes: any irregularity is noticeable at once.
Substrate preparation
Requirements for the wall
- Flatness: a deviation of no more than 3 mm over 2 m
- Verticality: checked with a level and a plumb line
- Strength: the ability to bear the weight of the tile
- Cleanliness: no dust, grease or old coverings
- Dryness: moisture content of no more than 4%
Preparatory work from M-STONE
- Removing old coverings
- Removing old tile, wallpaper, paint
- Cleaning off adhesive residues
- Taking away the debris
- Assessing the condition of the wall
- Checking flatness with a laser level
- Finding cracks and defects
- A plaster strength test
- Levelling
- Plastering (if necessary)
- Skim coat
- Sanding
- Waterproofing (for wet rooms)
- Applying coating waterproofing
- Reinforcing corners and junctions
- Checking watertightness
- Priming
- Applying a deep-penetration primer
- Increasing adhesion
- Binding dust
Choosing the adhesive mix
Vertical installation of large-format tile needs special adhesives with increased thixotropy (the ability not to run down a vertical surface).
Recommended types of adhesive
| Class | Properties | Application |
|---|---|---|
| C2TE | Thixotropic, extended open time | The standard choice for walls |
| C2TES1 | Thixotropic, flexible | For unstable bases |
| C2TF | Thixotropic, fast-setting | For accelerated installation |
Recommended brands
- Mapei Keraflex Maxi S1
- Litokol Litoflex K80 Eco
- Kerakoll H40 No Limits
- Ceresit CM 17
Important: for white marble, travertine and light onyx only white adhesive is used!
Laying technology
1. Marking
- Determining the horizontal and vertical with a laser level
- Marking the position of the slabs
- Planning the cuts
- Determining the starting point
2. Fitting a support ledger
- Fitting a temporary ledger for the first row
- Ensuring it is level
- Preventing the slabs from sliding
3. Preparing the adhesive
- Mixing according to the instructions
- The right consistency
- Working within the open time
4. Applying the adhesive (double application)
- On the wall with a 10-15 mm notched trowel
- On the back of the tile in a thin layer
- Ridges in one direction
5. Transporting the tile
- Using vacuum suction cups
- Moving it vertically
- A team of 2-4 people
6. Laying
- Pressing the tile against the wall
- Aligning to the marking
- Checking verticality and flatness
7. Fixing
- Fitting a levelling system (TLS)
- Temporary props (if necessary)
- Wedges for support
8. Cleaning
- Removing excess adhesive
- Cleaning the tile surface
- Ensuring joint depth for the grout
9. Grouting the joints
- After the adhesive has fully hardened (24-48 h)
- Epoxy or cement grout
- Shaping the joint
- Cleaning the surface
Features of installing different materials
Thin porcelain stoneware (3-6 mm)
- Special care when transporting
- Even pressure when laying
- Using a rubber roller for pressing
- Wide suction cups to spread the load
Natural stone
- Checking every slab for defects
- Selecting by colour and pattern
- Using white adhesive for light stones
- A water-repellent treatment is mandatory after installation
Backlit onyx
- Installing the frame with an offset
- Fitting the LED system
- A light diffuser
- Translucent grout for the joints
Designer laying techniques
Book-match
Two neighbouring slabs are laid as mirror images, creating a symmetrical pattern like an open book.
The effect: impressive symmetry, emphasis on the natural pattern of the stone Use: accent walls, bathrooms, halls Materials: marble with expressive veining (Calacatta, Statuario)
Vein-match
The veins of the stone continue from one slab to another, creating an uninterrupted pattern.
The effect: natural wholeness, as if it were one large slab of stone Use: large walls, facades Requirements: careful selection of slabs, highly skilled craftsmen
Cross-cut vs Vein-cut
Cross-cut: cutting the stone across the veins (a cloudy pattern) Vein-cut: cutting along the veins (a linear pattern)
Mixed laying
A combination of different materials:
- Marble + onyx
- Porcelain stoneware + metal
- Stone + wood
- Mirror + tile
Backlighting walls of large-format tile
LED backlighting behind onyx
Onyx is the only stone that lets light through, creating a magical effect.
Technology
- A metal frame with an offset of 80-150 mm
- LED panels or strips evenly across the area
- A diffuser (frosted glass or acrylic)
- Onyx slabs
- A controller with a dimmer and a remote
Possibilities
- Brightness control
- Colour change (RGB)
- Programmable scenarios
- Integration into a “smart home”
Contour lighting
An LED strip around the perimeter of a slab or niche creates the effect of a “floating” wall.
Lighting the joints
A special technique using light-conducting grouts or hidden LED strips in the joints.
Lighting niches
Niches in a wall clad with large-format tile, with built-in lighting.
What the cost depends on
- Type and size of the tile
- The material (porcelain stoneware, marble, onyx)
- Height and area of the walls
- Complexity of the geometry (niches, corners, projections)
- Condition of the base
- The need for preparatory work
- Type of laying (simple, book-match)
- Whether there is backlighting
- Order volume
For an exact calculation contact M-STONE!
Service areas in Kyiv
M-STONE works in all districts of Kyiv:
- Pechersk, Lypky, Zverynets
- Podil, Kontraktova Square
- Obolon, Minskyi Massiv
- Pozniaky, Osokorky, Kharkivskyi
- Darnytsia, Lisovyi
- Troieshchyna, Desnianskyi
- Vynohradar, Kurenivka
- Sviatoshyn, Borshchahivka, Akademmistechko
- Holosiiv, Teremky, Feofaniia
- Solomianka, Shuliavka, Karavaievi Dachi
Kyiv region: Brovary, Irpin, Bucha, Vorzel, Vyshhorod, Vyshneve, Boyarka, Ukrainka, Obukhiv, Kozyn, Koncha-Zaspa, Hostomel
Contact information
M-STONE: professional cladding of walls with large-format tile
📞 Phones: +38 068 100 27 96, +38 050 914 18 99 📧 Email: [email protected] 🌐 Website: https://mstone.ua/
Social media
- Instagram: https://www.instagram.com/mstone_kiev/
- Facebook: https://www.facebook.com/mstone.kyiv/
- YouTube: https://www.youtube.com/@M-Stone_Kyiv/
Why M-STONE?
✅ Expertise in vertical installation: complex laying techniques on walls ✅ Book-match and vein-match: creating symmetrical patterns ✅ Work with backlighting: LED systems for onyx and niches ✅ Natural stone: marble, travertine, onyx ✅ Professional equipment: vacuum suction cups, scaffolding, laser levels ✅ A quality guarantee: on all work carried out
The current cost of work for your project can be calculated in the online calculators or confirmed by the manager: it depends on the material, the slab format and the condition of the substrate. The consultation is free.

About M-STONE
This material was prepared by the M-STONE team: 20 years of brand history, installation of large-format tile and natural stone in Kyiv and across Ukraine. The company is led by Oleg Dolynskyi. The recommendations describe the typical order of work; a specialist refines the solution for your project after a consultation.
Contact us
We will price your project
Send the dimensions and slab format: we will calculate the material and installation and suggest the timing.